
Running OSPF on Cisco and Palo Alto Firewall for inter-zone communication
- February 13, 2024
- Posted by: Lyfey Technologies
- Categories: Cisco, Networking
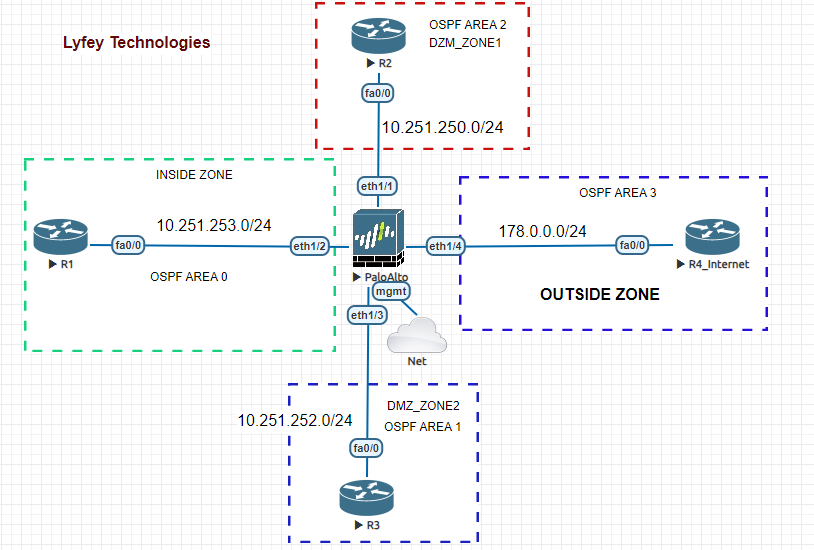
In this article, we guide you through a step-by-step configuration of configuring OSPF protocol on a network with Palo Alto Firewall and Cisco routers to achieve Interzone communication. Configuration of Palo Alto firewall is done on CLI.
Step 1: Basic configurations on Palo Alto Firewall
set deviceconfig system hostname PA01
set deviceconfig system type static
set deviceconfig system timezone Africa/Nairob
set deviceconfig system domain lab.local
set deviceconfig system ip-address 192.168.71.130
set deviceconfig system netmask 255.255.255.0
set deviceconfig system default-gateway 192.168.71.128
set deviceconfig system dns-setting servers primary 8.8.8.8
set deviceconfig system dns-setting servers secondary 1.1.1.1
Step 2: Configure interfaces on the PaloAlto Firewall
set network interface ethernet ethernet1/1 link-state up
set network interface ethernet ethernet1/1 comment ZONE_DMZ_1
set network interface ethernet ethernet1/1 layer3 interface-management-profile Ping
set network interface ethernet ethernet1/1 layer3 ip 10.251.250.100/24
set network interface ethernet ethernet1/2 comment INSIDE_ZONE
set network interface ethernet ethernet1/2 link-state up
set network interface ethernet ethernet1/2 layer3 interface-management-profile Ping
set network interface ethernet ethernet1/2 layer3 ip 10.251.253.100/24
set network interface ethernet ethernet1/3 comment DMZ_ZONE2
set network interface ethernet ethernet1/3 link-state up
set network interface ethernet ethernet1/3 layer3 interface-management-profile Ping
set network interface ethernet ethernet1/3 layer3 ip 10.251.252.100/24
set network interface ethernet ethernet1/4 layer3 ip 178.0.0.100/24
set network interface ethernet ethernet1/4 layer3 interface-management-profile Ping
set network interface ethernet ethernet1/4 comment OUTSIDE_ZONE
set network interface ethernet ethernet1/4 link-state up
Step 3: Configure Virtual router instance, assign interfaces to the virtual router and activate OSPF processes on the interfaces in different areas.
set network virtual-router VR02
set network virtual-router VR01 protocol ospf enable yes
set network virtual-router VR01 protocol ospf router-id 100.100.100.100
set network virtual-router VR01 interface [ ethernet1/1 ethernet1/2 ethernet1/3 ethernet1/4 ]
set network virtual-router VR01 protocol ospf area 0.0.0.3 type normal
set network virtual-router VR01 protocol ospf area 0.0.0.3 interface ethernet1/4 enable yes
set network virtual-router VR01 protocol ospf area 0.0.0.3 interface ethernet1/4 link-type broadcast
set network virtual-router VR01 protocol ospf area 0.0.0.0 type normal
set network virtual-router VR01 protocol ospf area 0.0.0.0 interface ethernet1/2 enable yes
set network virtual-router VR01 protocol ospf area 0.0.0.0 interface ethernet1/2 link-type broadcast
set network virtual-router VR01 protocol ospf area 0.0.0.1 type normal
set network virtual-router VR01 protocol ospf area 0.0.0.1 interface ethernet1/1 enable yes
set network virtual-router VR01 protocol ospf area 0.0.0.1 interface ethernet1/1 link-type broadcast
set network virtual-router VR01 protocol ospf area 0.0.0.2 type normal
set network virtual-router VR01 protocol ospf area 0.0.0.2 interface ethernet1/3 enable yes
set network virtual-router VR01 protocol ospf area 0.0.0.2 interface ethernet1/3 link-type broadcast
commit
Step 4: Configure your security zones on the Firewall and assign interfaces to respective zones accordingly
set zone OUTSIDE_ZONE network layer3 ethernet1/4
set zone INSIDE_ZONE network layer3 ethernet1/2
set zone DMN_ZONE1 network layer3 ethernet1/1
set zone DMZ_ZONE2 network layer3 ethernet1/3
Step 5: Configure a security policy to allow communication between zones. We allow communication among all zones in our lab simulation.
set rulebase security rules Allow_ALL to any
set rulebase security rules Allow_ALL from any
set rulebase security rules Allow_ALL source any
set rulebase security rules Allow_ALL destination any
set rulebase security rules Allow_ALL source-user any
set rulebase security rules Allow_ALL category any
set rulebase security rules Allow_ALL application any
set rulebase security rules Allow_ALL service application-default
set rulebase security rules Allow_ALL hip-profiles any
set rulebase security rules Allow_ALL action allow
Step 6: Configure the routers in different zones as follows:*********************************R1
enable
configure terminal
hostname R1
interface FastEthernet0/0
ip address 10.251.253.10 255.255.255.0
!
router ospf 10
router-id 1.1.1.1
log-adjacency-changes
network 10.251.253.0 0.0.0.255 area 0
!*******************************R2
enable
configure terminal
hostname R2
interface FastEthernet0/0
ip address 10.251.250.10 255.255.255.0
!
router ospf 10
router-id 2.2.2.2
log-adjacency-changes
network 10.251.250.0 0.0.0.255 area 1
!********************************R3
enable
configure terminal
hostname R3
!
interface Loopback0
ip address 3.3.3.3 255.255.255.255
ip ospf 10 area 2
!
interface FastEthernet0/0
ip address 10.251.252.10 255.255.255.0
!
router ospf 10
router-id 3.3.3.3
log-adjacency-changes
network 10.251.252.0 0.0.0.255 area 2*****************************R4
enable
configure terminal
hostname R4
!
interface FastEthernet0/0
ip address 178.0.0.10 255.255.255.0
!
router ospf 10
router-id 4.4.4.4
log-adjacency-changes
network 178.0.0.0 0.0.0.255 area 3
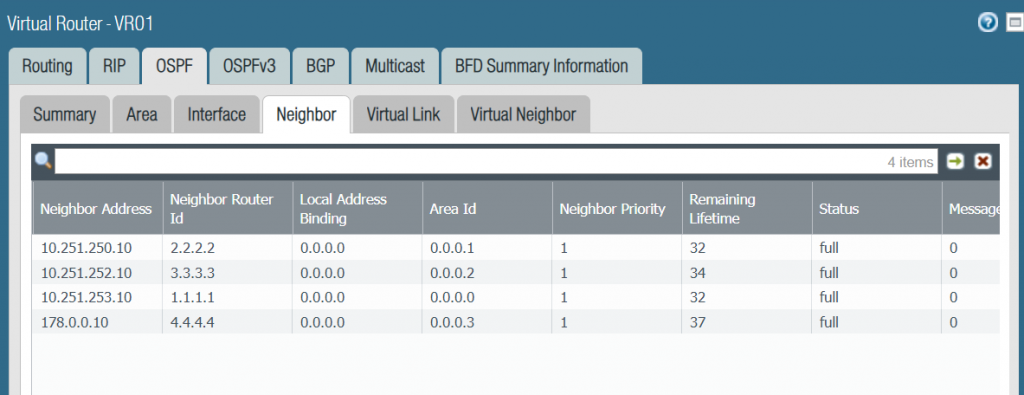
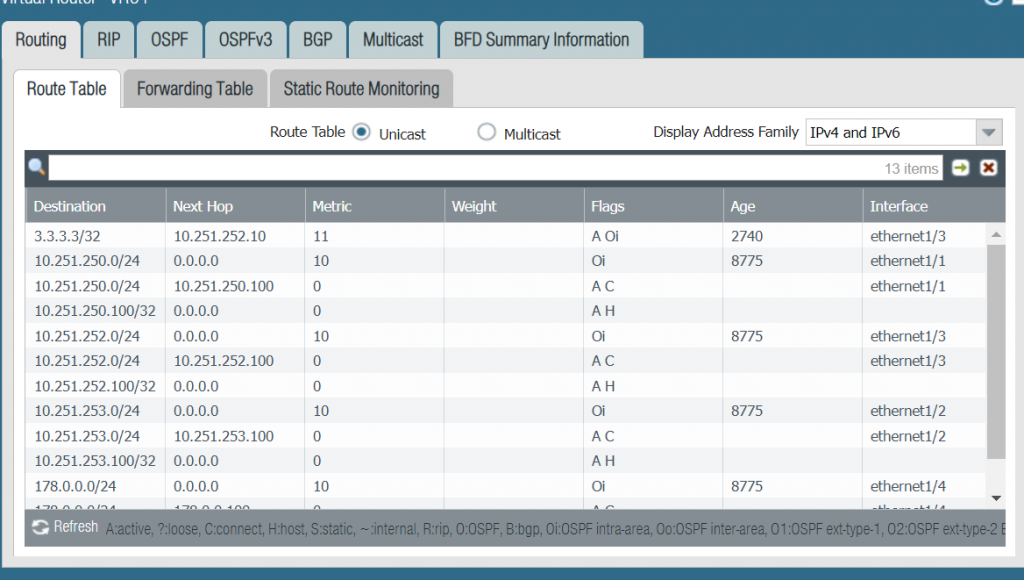
!Step 7: Verification. Check the status of OSPF on the routers in different zones and on the Palo Alto FW. Check the routing table on the FW to confirm we are able to learn routes through OSPF protocol.

393 Comments
Leave a Reply
You must be logged in to post a comment.
[…] When setting up your network composed of Cisco routers and Palo Alto Firewalls, you have multiple options for achieving communication within your AS and also communication with outside networks. You can use static routes or run dynamic routing protocols like OSPF, RIP, and BGP. In our last article, we demonstrated how to configure OSPF between your Cisco routers and the Palo Alto firewall. Check out the lab simulation on OSPF configuration from this link: Configuring OSPF between Cisco routers and Palo Alto Firewalls […]