
Implementing OSPF Stub Areas on Cisco Routers
- April 7, 2024
- Posted by: Lyfey Technologies
- Categories: Cisco, Networking
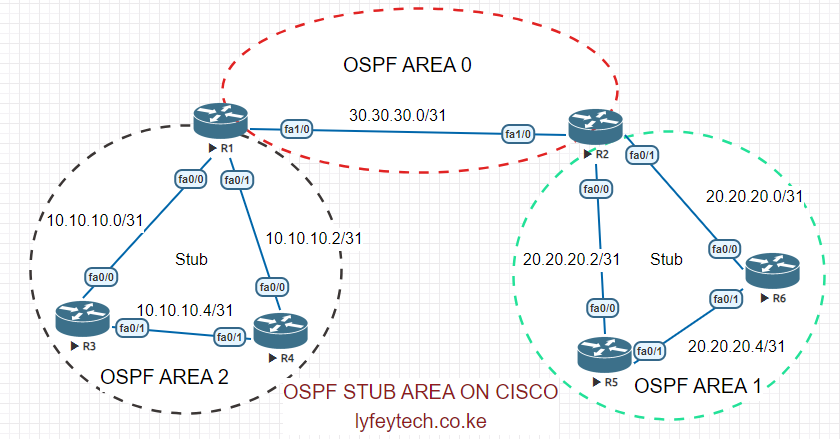
An OSPF Stub Area helps in simplifying routing in larger OSPF networks and makes routing more efficient. Routers in a stub area do not flood external (Type 5) LSAs and Type 3 LSAs (depending on the type of stub area).
Routers within a stub area only know internal routes, making routing tables smaller and more efficient. SPF calculation is simpler and faster convergence is possible.
Configuration Steps
Step 1: Configure IP addresses on interfaces on all routers.
*****************************R1
enable
configure terminal
!
interface Loopback0
 ip address 1.1.1.1 255.255.255.255
!
interface FastEthernet0/0
 ip address 10.10.10.0 255.255.255.254
 no shutdown
!
interface FastEthernet0/1
 ip address 10.10.10.2 255.255.255.254
 no shutdown
!
interface FastEthernet1/0
 ip address 30.30.30.0 255.255.255.254
 no shutdown
!
*****************************R2
enable
configure terminal
!
interface Loopback0
ip address 2.2.2.2 255.255.255.255
!
interface FastEthernet0/0
ip address 20.20.20.2 255.255.255.254
no shutdown
!
interface FastEthernet0/1
ip address 20.20.20.0 255.255.255.254
no shutdown
!
interface FastEthernet1/0
ip address 30.30.30.1 255.255.255.254
no shutdown
!*****************************R3
enable
configure terminal
!
interface Loopback0
ip address 3.3.3.3 255.255.255.255
!
interface FastEthernet0/0
ip address 10.10.10.1 255.255.255.254
no shutdown
!
interface FastEthernet0/1
ip address 10.10.10.4 255.255.255.254
no shutdown
!*****************************R4
enable
configure terminal
!
interface Loopback0
ip address 4.4.4.4 255.255.255.255
!
interface FastEthernet0/0
ip address 10.10.10.3 255.255.255.254
no shutdown
!
interface FastEthernet0/1
ip address 10.10.10.5 255.255.255.254
no shutdown
!*****************************R5
enable
configure terminal
!
interface Loopback0
ip address 5.5.5.5 255.255.255.255
!
interface FastEthernet0/0
ip address 20.20.20.3 255.255.255.254
no shutdown
!
interface FastEthernet0/1
ip address 20.20.20.4 255.255.255.254
no shutdown
!*****************************R6
enable
configure terminal
!
interface Loopback0
ip address 6.6.6.6 255.255.255.255
!
interface FastEthernet0/0
ip address 20.20.20.1 255.255.255.254
no shutdown
!
interface FastEthernet0/1
ip address 20.20.20.5 255.255.255.254
no shutdown
!Step 2: Configure OSPF on all the routers.
******************************R1
router ospf 10
 router-id 1.1.1.1
 log-adjacency-changes
 network 1.1.1.1 0.0.0.0 area 0
 network 10.10.10.0 0.0.0.1 area 2
 network 10.10.10.2 0.0.0.1 area 2
 network 30.30.30.0 0.0.0.1 area 0
!
******************************R2
router ospf 10
router-id 2.2.2.2
log-adjacency-changes
network 2.2.2.2 0.0.0.0 area 0
network 20.20.20.0 0.0.0.1 area 2
network 20.20.20.2 0.0.0.1 area 2
network 30.30.30.0 0.0.0.1 area 0
!******************************R3
router ospf 10
router-id 3.3.3.3
log-adjacency-changes
network 3.3.3.3 0.0.0.0 area 0
network 10.10.10.0 0.0.0.1 area 2
network 10.10.10.4 0.0.0.1 area 2
!******************************R4
router ospf 10
router-id 4.4.4.4
log-adjacency-changes
network 4.4.4.4 0.0.0.0 area 0
network 10.10.10.2 0.0.0.1 area 2
network 10.10.10.4 0.0.0.1 area 2
!******************************R5
router ospf 10
router-id 5.5.5.5
log-adjacency-changes
network 5.5.5.5 0.0.0.0 area 0
network 20.20.20.2 0.0.0.1 area 1
network 20.20.20.4 0.0.0.1 area 1
!******************************R6
router ospf 10
router-id 6.6.6.6
log-adjacency-changes
network 6.6.6.6 0.0.0.0 area 0
network 20.20.20.0 0.0.0.1 area 1
network 20.20.20.4 0.0.0.1 area 1
!Step 3: Verify OSPF adjacent status on all routers


Step 4: Create Loopback 100 on R3 and redistribute it into OSPF as an external route.
******************************R3
!
interface Loopback100
ip address 100.100.100.100 255.255.255.255
!
ip prefix-list DISTRIBUTE_DIRECT seq 10 permit 100.100.100.100/32
!
route-map DISTRIBUTE_DIRECT permit 10
match ip address prefix-list DISTRIBUTE_DIRECT
!
router ospf 10
redistribute connected subnets route-map DISTRIBUTE_DIRECT
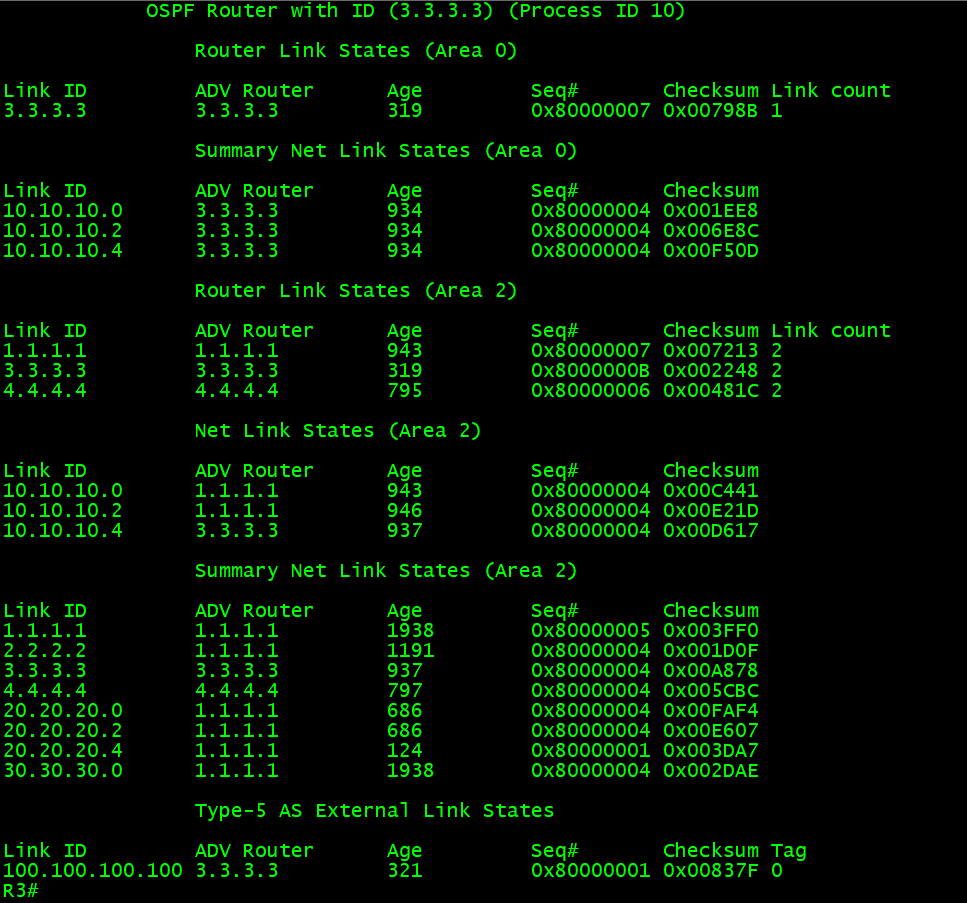
!Step 5: Verify LSDB on all routers. As shown below, R3 and R5 have received Type 5 LSAs in their LSDB.
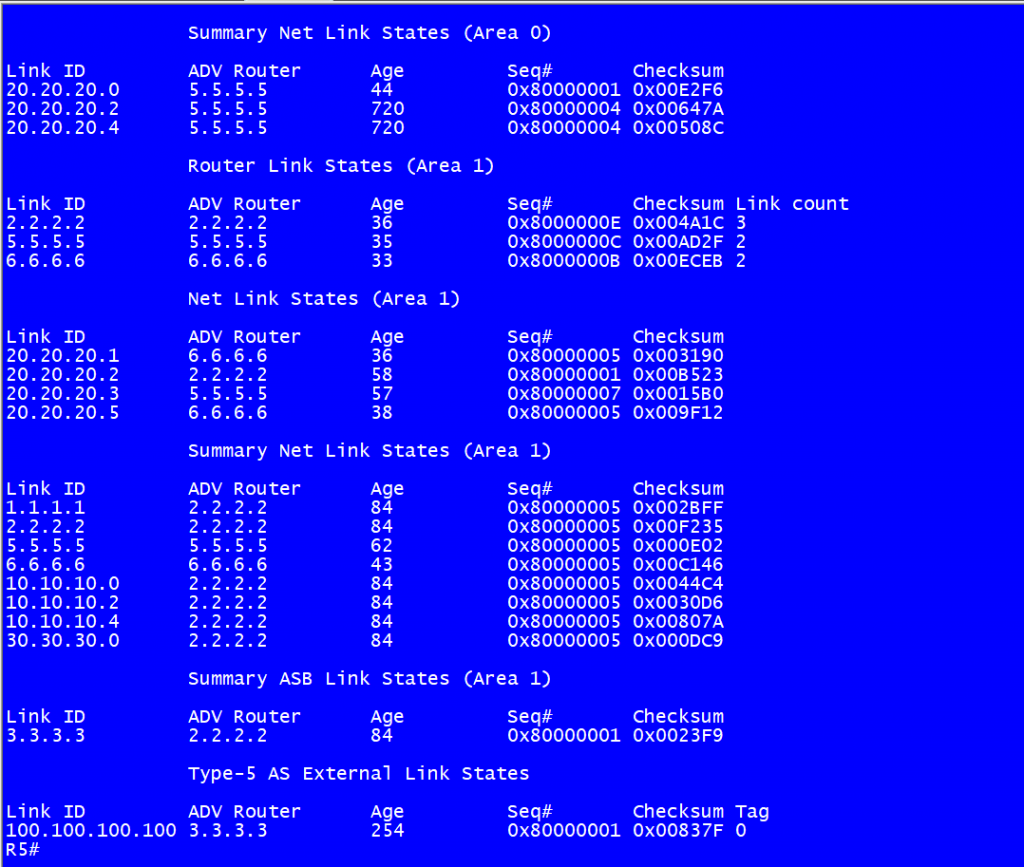
Step 6: Configure Area 1 as Stub area. Run stub command on R2, R5 and R6.
Note: The stub command must be run on all routers in Area 1 for the area to be stub area. The adajaceny relationship will go down if stub is configured only on one of the adjacent routers.
***************************R2,R5,R6
!
router ospf 10
area 1 stub
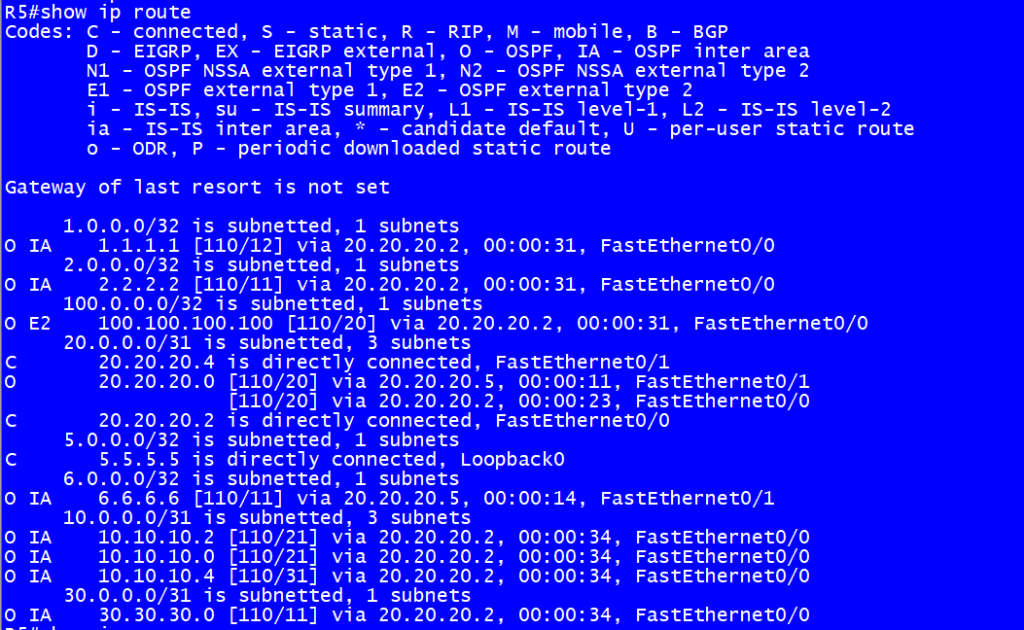
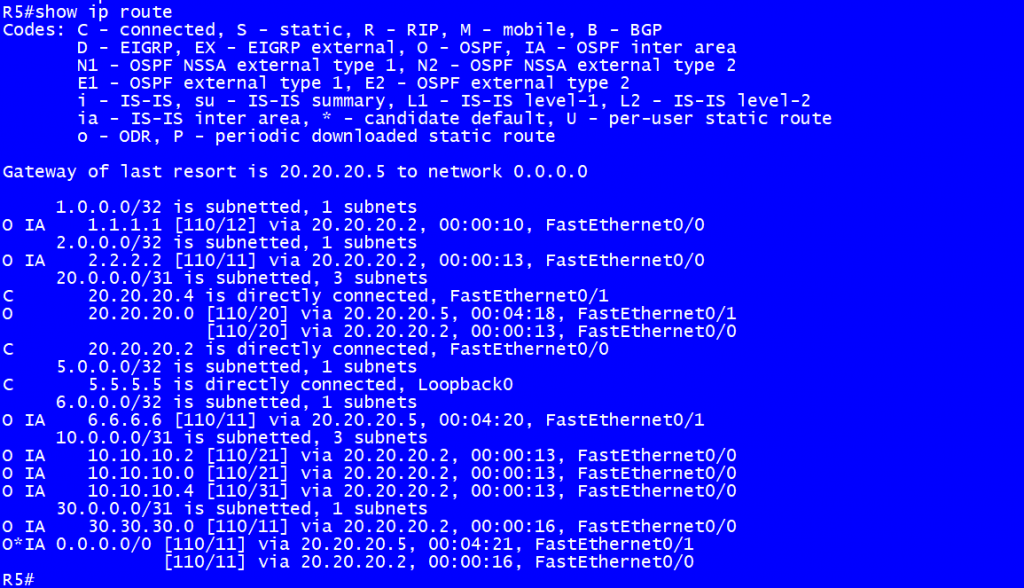
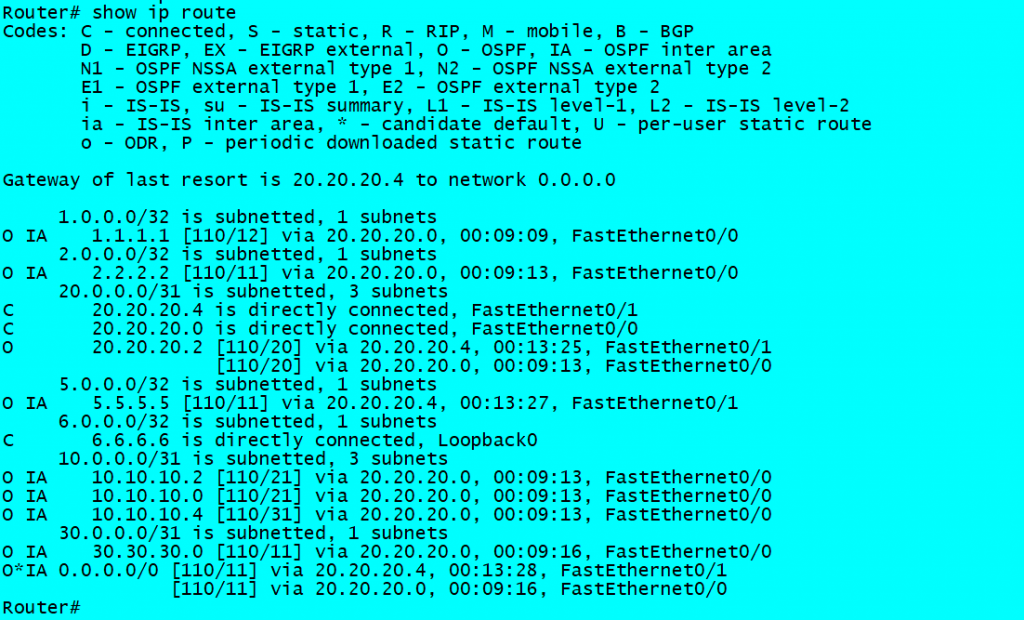
!Step 7: Verify the routing table of R5 and R6
Thank you for reading this article, please leave your comments in the comments section and check other related posts on our website.
Related Posts
- Step by step guide on how to implement different networking protocols on Juniper MX routers
- L2 EVPN Implementation on Huawei Routers.
- VRRP Monitoring of the Uplink Interface status on Huawei routers.
- Association between VRRP and BFD Implementation on Huawei routers.
- Association between VRRP and STP Implementation on Huawei routers.
396 Comments
Leave a Reply
You must be logged in to post a comment.
Thanks