
How to configure Link Aggregation on Nokia Routers
- March 10, 2024
- Posted by: Lyfey Technologies
- Categories: Networking, Nokia

In our last lab, we discussed the benefits of link aggregation and demonstrated how to setup and configure link aggregation on Huawei routers. You can check out the article from this link: https://lyfeytech.co.ke/implementing-link-aggregation-on-huawei-routers/
In this lab, we demonstrate how to configure link aggregation on Nokia routers.
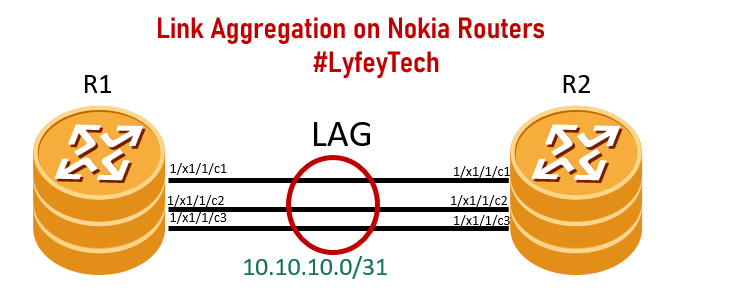
Topology Diagram: We have two Nokia SR2S routers connected with three 100G links. The objective is to bundle the three links into one logical aggregated link and confirm the LAG status.
Configuration step 1: Configure the physical ports on the two routers.
*******************************R1
/configure port 1/x1/1/c1  connector breakout c1-100g
/configure port 1/x1/1/c1  no shut
/configure port 1/x1/1/c1/1  no shut
/configure port 1/x1/1/c1/1 desc "to R2 1/x1/1/c1/1"

/configure port 1/x1/1/c2  connector breakout c1-100g
/configure port 1/x1/1/c2  no shut
/configure port 1/x1/1/c2/1  no shut
/configure port 1/x1/1/c2/1 desc "to R2 1/x1/1/c2/1"

/configure port 1/x1/1/c3  connector breakout c1-100g
/configure port 1/x1/1/c3  no shut
/configure port 1/x1/1/c3/1  no shut
/configure port 1/x1/1/c3/1 desc "to R2 1/x1/1/c3/1"

/configure port 1/x1/1/c1/1 ethernet
		lldp
                dest-mac nearest-bridge
                    admin-status tx-rx
                    notification
                    tx-tlvs port-desc sys-name sys-desc sys-cap
                    tx-mgmt-address system
                exit all
/configure port 1/x1/1/c2/1 ethernet
		lldp
                dest-mac nearest-bridge
                    admin-status tx-rx
                    notification
                    tx-tlvs port-desc sys-name sys-desc sys-cap
                    tx-mgmt-address system
                exit all

 /configure port 1/x1/1/c3/1 ethernet
		lldp
                dest-mac nearest-bridge
                    admin-status tx-rx
                    notification
                    tx-tlvs port-desc sys-name sys-desc sys-cap
                    tx-mgmt-address system
                exit all
***************************************R2
/configure port 1/x1/1/c1 connector breakout c1-100g
/configure port 1/x1/1/c1 no shut
/configure port 1/x1/1/c1/1 no shut
/configure port 1/x1/1/c1/1 desc "to R1 1/x1/1/c1/1"
/configure port 1/x1/1/c2 connector breakout c1-100g
/configure port 1/x1/1/c2 no shut
/configure port 1/x1/1/c2/1 no shut
/configure port 1/x1/1/c2/1 desc "to R1 1/x1/1/c2/1"
/configure port 1/x1/1/c3 connector breakout c1-100g
/configure port 1/x1/1/c3 no shut
/configure port 1/x1/1/c3/1 no shut
/configure port 1/x1/1/c3/1 desc "to R1 1/x1/1/c3/1"
/configure port 1/x1/1/c1/1 ethernet
lldp
dest-mac nearest-bridge
admin-status tx-rx
notification
tx-tlvs port-desc sys-name sys-desc sys-cap
tx-mgmt-address system
exit all
/configure port 1/x1/1/c2/1 ethernet
lldp
dest-mac nearest-bridge
admin-status tx-rx
notification
tx-tlvs port-desc sys-name sys-desc sys-cap
tx-mgmt-address system
exit all
/configure port 1/x1/1/c3/1 ethernet
lldp
dest-mac nearest-bridge
admin-status tx-rx
notification
tx-tlvs port-desc sys-name sys-desc sys-cap
tx-mgmt-address system
exit allConfiguration Step 2: Configure LAG on the two routers and add the three ports into the LAG
**************************R1
configure lag 1
        description "TO_R2_LAG_2"
        port 1/x1/1/c1/1
        port 1/x1/1/c2/1
        port 1/x1/1/c3/1
        lacp active administrative-key 1
        no shutdown
**************************R2
configure lag 1
description "TO_R1_LAG_1"
port 1/x1/1/c1/1
port 1/x1/1/c2/1
port 1/x1/1/c3/1
lacp active administrative-key 1
no shutdownConfiguration Step 3: Configure a network interface and bind the lag onto the interface
***********************************R1
/configure router interface "TO_R2"
            address 10.10.10.0/31
            description "TO_R2"
            port lag-1
            no shutdown
admin save
******************************R2
/configure router interface "TO_R1"
address 10.10.10.1/31
description "TO_R1"
port lag-1
no shutdown
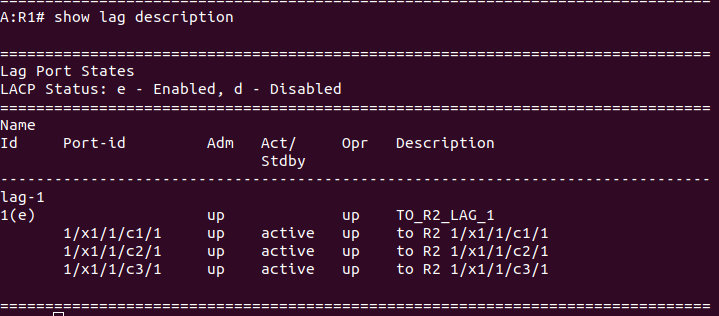
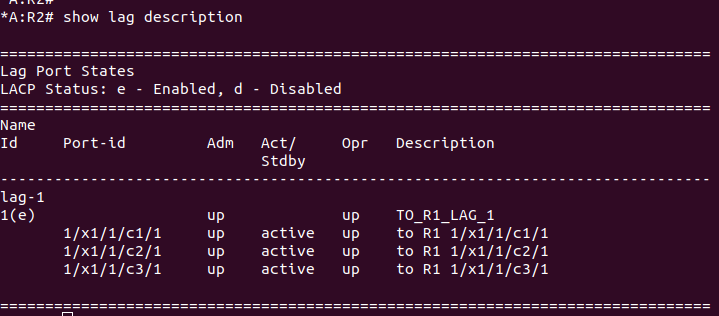
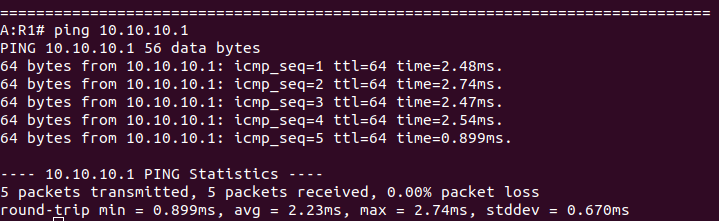
admin saveVerify the LAG status and confirm connectivity between the two routers through pinging interface IPs. The LAG is up on both routers and we can ping 10.10.10.1 on Router R2 as shown below.
Leave a Reply
You must be logged in to post a comment.